
Get out there!
What to Bring?
This section explores essential equipment for a self-supported bicycle tour. How comfortable you will be depends on the quality of your equipment and your preparation for pitfalls along the way. Deciding that you want to bicycle tour is fantastic, but it’s only the first step in making your vacation a success. There are four aspects that merit discussion:
There is never a universally accepted “best” solution, only the best choice for you. To have a successful touring experience, you must have equipment that’s a good fit for your budget, the characteristics of your tour, and – of course – your personality. Take care of yourself and your equipment and you can ride until you run out of roads (or, more likely, funds).
Bicycle Type
A bicycle is generally a prerequisite for undertaking a bicycle tour! However, I have occasionally spotted tricycle tourists on the road, and I am sure that someone has pedaled a unicycle across the globe. Based on first-hand evidence, I have become convinced that virtually any bicycle can be used for a bicycle tour, if you can tolerate discomfort.
Literary Note
Covering long distances on odd bicycles are the specialty of British author Tim Moore. In Gironimo! (2015) he famously retraced the 1914 Giro d’Italia course on an ancient one-speed racing bike with wooden wheels cork brake pads. A few years later, in The Cyclist Who Went Out in the Cold, Moore pedaled the length of the Iron Curtain on a modified East German MIFA 900 folding bike with 20-inch tires whose intended use was to get to the grocery store and back.

It could be argued that Tim Moore chose such extravagant machines for his tour precisely because he intended to write adventure-packed books. Ordinary bicycle tourists may not be as pleased to snap a fork or bust a crank in the middle of a sandstorm one hundred kilometers from the nearest oasis. On the other side of the spectrum, fancy lightweight road racing bikes are designed for speed and handling, which is not a good match for touring. Most touring cyclists will gravitate towards either a touring-specific bicycle or a sturdy machine that can be customized for touring use.
Touring Bikes
These are bikes made with touring in mind! The geometry results in a more upright riding position, helping to maintain stability while fully loaded. Additionally, the frame is designed to have a long wheelbase, increasing stability. A long wheelbase means longer chain stays, which moves the rear panniers farther away from the cranks, thus making it less likely for large-footed cyclists to bang their heels against them. Any bicycle that can accept a rear rack will work for a three-day tour, but otherwise a touring bicycle is the best all-around option (some models are even sold with a pre-installed rear rack).
Gravel Bikes

Many gravel bikes can be used for bike touring. Indeed, a gravel bike is preferable for rugged bikepacking tours in the wilderness or over long stretches of poorly maintained roads. Gravel bikes tend to have wider, knobbier tires for better grip. Some frames have eyelets and braze-ons for racks. For those that don’t, bags that attach directly to the frame or seat post can be used. Suspension is also an option to overcome obstacles like rocks and roots more easily. A hardtail (front fork suspension) setup makes trail-riding more comfortable without sacrificing room for hauling gear. However, a full-suspension (front fork and rear suspension) setup makes hauling gear more difficult, as rear panniers become impossible to mount and the space available for a frame bag is reduced. Therefore, a bikepacking setup is recommended on full-suspension bikes.
Recumbent Bikes

No diamond-frame bicycle can match the comfort of a recumbent. Pedaling in a supine position means that arms and hands do not support any weight. Back and buttocks are fully supported by an ergonomic seat. Riding a recumbent means not worrying about neck pain, hand numbness, or chafing. One drawback of the low profile is that recumbents must often have flags or other bright markings to make themselves more visible to vehicles. Short wheelbase recumbent bikes can be used for sport touring, but on long tours, a long wheelbase recumbent is superior. Because recumbents are built by smaller manufacturers, they cost approximately twice as much as comparable diamond-frame bicycles.
Tandem Bikes
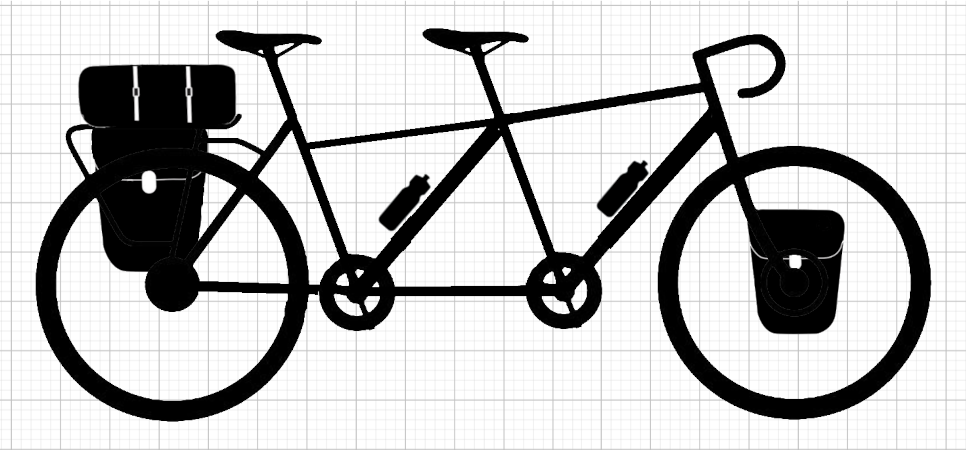
For two people willing to be close to each other all the time, the tandem is a great invention. Having one bicycle rather than two reduces total weight and lessens the chance of mechanical failures. If one rider is significantly stronger than the other, the tandem acts as a great equalizer. The biggest disadvantage of touring with a tandem is the physical size of the machine, a real hindrance when traveling by land, sea, or air. S&S Couplers allow you to split your tandem into two so it can be packed into standard bicycle boxes. The couplings have interlocking, tapered teeth that are strong and stiff when joined but can be easily opened with a wrench.
Recumbent Tandem Bikes
Yes, there is such a thing as a recumbent tandem. To hear about a unique ride on a recumbent tandem, please listen to the episode titled “An Optimized Tour of New Churches.”
Tip
Regardless of what type of bike you choose, be sure to take time to get it properly fitted. This will go a long way in preventing aches and pains on the trip.
Things to Look for in a Bicycle
Giants of the Road
Heinz Stücke rolled out of his West German hometown in 1962, embarking on a world tour that lasted 51 years. Before his “retirement,” he reportedly pedaled 648,000 kilometers and visited 196 countries by bicycle. He has appeared countless times in the media. The subject of a Netflix documentary, “The Man Who Wanted to See it All,” Stücke summed up what to look for in a traditional touring bicycle: “I’ve met a lot of bicycle enthusiasts who ask many questions about speeds, gear ratio, the weight of the equipment carried, the height of the saddle, handlebars, and many other technical things that I never thought of or imagined. But what I wanted was a strong, reliable cycle which needed as little maintenance and repair as possible.”
Strong, Flexible Frame
Because a touring bicycle will experience increased stresses, a good choice for the frame material is strong, flexible chrome molybdenum (chromoly) steel alloy. Steel absorbs road vibrations, leading to a more comfortable ride. In the unlikely event that a steel frame breaks, it can be welded at a shop almost anywhere in the world.
A second material choice is an aluminum alloy. Years ago, aluminum frames had reliability issues, despite employing unsightly oversized tubes for strength. Compared to their chromoly counterparts, aluminum tubes these days are only 20-30% larger in diameter and have about twice the wall thickness. As a result, many attractive and reliable frames are being made of strong, lightweight aluminum alloys.
A titanium alloy is a third, more expensive material choice. Titanium alloys have great fatigue resistance, meaning they are capable of enduring repeated cyclical (no pun intended) stress without failing. At the same time, the frames can be made stiff enough to provide a comfortable ride. Titanium frames don’t require painting, as the alloy forms a stable oxide film on its surface, but it does not pass oxygen and does not oxidize further. One drawback of titanium is that it’s much more difficult to work than steel, so if there is a frame failure on the road, it will be very difficult to repair.
The last common material is carbon fiber. A frame is built up by adding successive layers of carbon fiber sheets embedded in epoxy resin. The resulting lightweight, high-strength frames now dominate the world of high-performance racing bikes. Carbon touring bicycles do exist, and these are, unsurprisingly, lighter than their metal equivalents. Since carbon fiber has the characteristic that holes cannot be tapped to provide screw threads for racks, carbon frames work best with a bikepacking setup. Traditionally, the biggest drawback of carbon for touring has been the composite’s poor performance in a crash or similar mishap. A damaged carbon fiber frame can be repaired successfully, but this is best done by experts.
Attachment Points
Historical Note
A braze-on is any fitting that has been permanently attached to the bicycle frame, such as the cable guides and stops or the water bottle cage mounts. The name came about because traditionally pieces of steel were attached to the steel frame with molten brass by a process called brazing. In brazing, a filler metal with a lower melting point than the adjacent metals is melted and flowed into the volume between the two pieces to be bonded. The name braze-on persists even though today the fittings might be attached by welding, molding, or gluing.
For traditional fully loaded touring, the most important braze-ons are the “eyelets,” 4mm threaded holes to which the front and rear racks and fenders can attach. Although individual bicycle frames vary on the quantity of eyelets they have, these are usually located near the rear wheel axle dropout, on the seat stays, on the fork dropout, and mid-fork. Bikes that don’t have the full set of eyelets can still be used for fully loaded touring. For example, some racks use an alternative quick-release mounting system. Some rack manufacturers offer mounting sets for adapting bikes that are missing eyelets, and equivalent homemade solutions like using P-clams to create attachment points are also possible. Lastly, a bikepacking setup dispenses with racks and therefore does not rely on the presence of eyelets at all.
Sturdy Wheels
A touring wheel is designed to withstand heavy loads and work reliably over long distances. These heavy-duty wheels are therefore heavier than road or gravel bike wheels. Generally, wheels are made up of a hub, spokes, a rim, and a tire (possibly containing an inner tube).
Tires
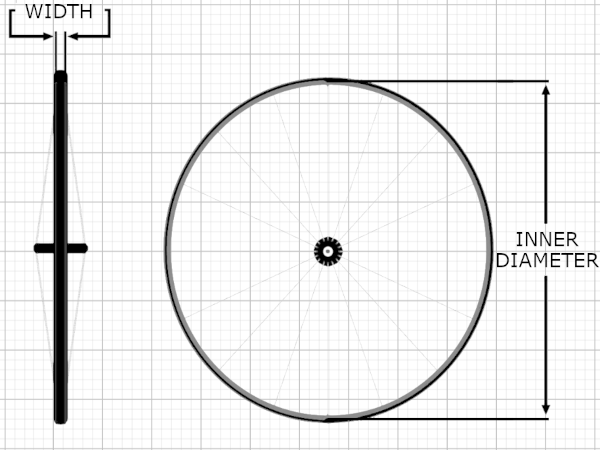
Let’s start where the rubber meets the road: the tire. There are many things that mankind would surely do differently if it had chance to start over, and the bicycle tire naming convention is no exception. A tire has two key parameters: (1) an inner diameter to fit a corresponding rim and (2) a maximum width, or distance between the sidewalls. How hard can it be?
Historical Note
John Boyd Dunlop and Édouard Michelin were two important figures in the development of modern bicycle tires. Dunlop, a Scotsman living in Belfast, developed the first practical pneumatic tire in 1887 for his son’s tricycle. Michelin, a Frenchman, introduced a tire with a removable inner tube in 1891. As the tire industry developed, different manufacturers came up with their own naming conventions. The British chose imperial units, while the French preferred metric. To add to the confusion, many manufacturers chose to number tires by their approximate outer diameter, which is of course dependent on the width. In the French system, a 700 tire refers to its approximate outer diameter in millimeters. Although 700a, 700b, 700c, and 700d variants existed, manufacturers settled on 700c. in the 1970s, mountain bikes originated in the United States, using wheels were 26 inches in diameter. With no standard in place, at least six different “26 inch” sizes came into existence.
The ISO standard 5775 is an attempt to standardize the sizes of bicycle tires and rims, categorizing them by rim diameter and width. Mountain bikes started with 26-inch tires, but in the last 15 years have evolved to 27.5 or 29 inches, which have metric equivalents. As shown in the simplified table below, a “29er” and a 700c tire can both be mounted on a 622mm rim.

In practice, however, mountain bike wheels tend to be much wider and require much wider rim beds for the tire to seat correctly. Compare, for example, a common mountain bike tire, 29 x 2.1 inch (ISO 54-622) with a common road bike tire, 700c x 25 mm (ISO 25-622).
Which tires make sense for touring? A 700c wheel is advantageous, as the larger diameter will result in a larger distance traveled in a given gear and can better handle bumps in the road. A mitigating factor is that, while the three sizes listed in the simplified table are commonly available in Europe and North America, in the rest of the world 26-inch tires and inner tubes are most common. In terms of width, a wider tire is desirable since the load can be distributed over a larger contact patch. Widths of 28-50 mm are usually desirable because they are faster on pavement than fat tires and can handle rougher roads than thin racing tires. Of course, the rougher the terrain to be traversed, the wider the tire required to stay in control. In sand and gravel, at least 32 mm is recommended. Wider tires can be pumped to a lower pressure, increasing the ground contact patch and improving handling on loose or wet surfaces. Conversely, on smooth, paved roads, tires with reduced tread patterns, called slicks, are preferable to knobby tires.
Beyond its dimensions, a tire can vary greatly in its quality and robustness. Heavy-duty tires and inner tubes made with extra-thick rubber carry a weight penalty that many touring cyclists are happy to pay in exchange for greater puncture protection. The German brand Schwalbe has an excellent reputation among touring cyclists. Schwalbe’s Marathon Plus tires offer a 5mm-thick Smartguard layer and sidewall protection. Continental, another German brand, sells Gatorskin tires that incorporate a polyester fiber with a tight crosswise weave for maximum puncture protection. Vittoria, Michelin, and Hutchinson are also reputable brands selling touring-oriented tires.
Tubeless Tires
Recently, tubeless tires have gained popularity in the mountain biking, cyclocross, and even road racing communities. As the name states, these tires have no inner tube, relying instead on a latex sealant to prevent flats. Compared to the heavy-duty tires, going tubeless is marketed as a lighter, lower-rolling-resistance, fewer-flats solution. The first step is to purchase “tubeless ready” tires, which can be used both with and without an inner tube. A local bicycle shop can help in finding compatible tire/rim combinations. Next comes mounting the tire on the rim, filling it with air until it pops into place, and adding the latex sealant. Although they might be a bit tricky to mount initially, tubeless tires with working sealant should hold up to all but the most catastrophic punctures. During the rigors of a tour, the tubeless tire can unfortunately still lose air in various ways. For example, riding over potholes or rocks can cause the tire to briefly unseat and some air to bleed out, especially on the heavily loaded rear tire. Or, if the sealant has dried out due to hot temperatures, any puncture will make the tire go flat.
Valves
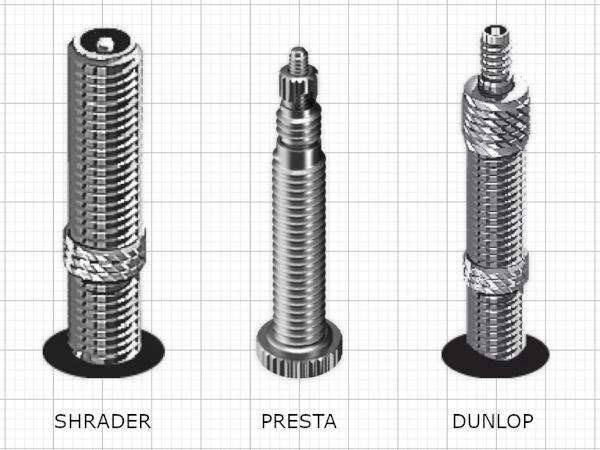
Finally, a brief note on valves, the interface between the air source and the inner tube or tubeless tire. There are three types of air valves used on bicycles: Shrader, Presta, and Dunlop (Woods). Shrader is the wider, automotive-style valve, conveniently compatible with air compressors at gas stations worldwide. Presta is the narrower valve found on high-performance bicycles. Lastly, the Dunlop valve has a wider base, like Shrader, and a narrower top, like Presta. Dunlop valves, which are still seen in Europe and Asia, can be pumped with a Presta pump.
If you plan to tour on your bicycle as-is, then your rims, hubs, and spokes have already been chosen. Some touring cyclists eagerly upgrade their wheels, especially the rear one, which takes a heavy beating. Investing in a quality setup minimizes the hassle of broken spokes, wobbly wheels, and worse. Furthermore, with hand-built wheels, you can select a specific rim, hub, and spokes to match your exact requirements.
Rim
Modern rims for touring are made of aluminum. Cheaper single-wall rims have a simple U cross-section that won’t withstand touring conditions well. A double-wall rim uses two parallel layers of aluminum. The spokes attach to the hub at the lower layer, while the upper layer has corresponding holes for the insertion of the nipple heads or a screwdriver. More expensive double-wall rims use additional reinforcements to reinforce the spoke holes and optimize load distribution. Of course, rim size selection depends on the desired tire width.
Hub
Although the big drivetrain manufacturers (Shimano, SRAM, Campagnolo) control a significant part of the hub market, there are countless options to meet every budget. Besides the usual considerations for front and rear wheel hubs (disc brakes, freehub, number of spokes) it is worth mentioning the internal-gear hubs manufactured by Shimano, SRAM, and Rohloff, among others. Internal-gear hubs offer huge advantages for touring. The gears (yielding 3 to 14 different ratios) are immersed in an oil bath and protected by a sealed aluminum shell, meaning fewer parts are susceptible to damage. Internal-gear hubs are nearly maintenance free, except for an oil change either every 5,000 kilometers (3,100 miles) or once per year. They also offer a wide gear range, which is great for touring (see below). The biggest drawback of the gold-standard Rohloff 14-speed hub is its price tag, around $1,500 for the hub and twist shifter. Recently, Shimano introduced the Alfine 8-speed hub ($200) and 11-speed hub ($400), which can be used for touring but are optimized for urban use (that is, not for climbing mountains fully loaded). Lastly, for those looking to generate electricity for lighting and charging while pedaling, the German-made Schmidt SON dynamo hub is a market leader.
Spokes
Until the early 1980s, bicycle wheels had 36 spokes. Advancements have led to a reduction in spoke counts to 24 or 16 for some racing bikes. Overall, the new standard has become 32 spokes per wheel. Everything else being equal, 36-spoke wheels are stronger than 32-spoke wheels. Thicker gauge spokes can also be used for extra strength. In addition to the heavy loads it must hold, a rear wheel with a derailleur drivetrain has spokes of different lengths. On a conventional rear hub, the left and right flanges are at different distances from the wheel centerline. The drive-side spokes are shorter to allow room for the freehub and cassette, which makes the wheel inherently weaker. In contrast, an internal-gear hub is placed symmetrically on the wheel, with the flanges at the same distance from the wheel centerline. This results in even tension across every spoke, making for a stronger wheel. Therefore, whether using a cassette or internal-gear hub, 36-spoke rear wheels are recommended for fully loaded touring. Alternate arrangements are to use a 32-spoke front wheel, or two 32-spoke wheels for lighter bikepacking trips. For tandem bicycle touring, 40- or 48-spoke wheels are suggested.
Wide Gear Range
Before setting off, it’s best to have a wide gear range available. While this makes intuitive sense, the details of what is happening require understanding a bit of physics.
Warning: Detour Ahead
To learn more about the physics of bicycle propulsion, including gear ratios and gear inches, please see here: COMING SOON.
High-Quality Brakes
Because a fully loaded bicycle requires excellent stopping power, most newer touring models are fitted with disc brakes. Compared to the traditional cantilever or V-style brakes, disc brakes won’t wear down the rim wall while they brake. Moreover, disc brakes offer increased stopping force, better heat dissipation, and better wet-weather performance than rim brakes. One drawback is that disc brake rotors can get warped, either due to excessive braking or by direct impact while pushing or parking the bike. Rotors can also get warped during air transportation, so care must be taken to protect them when packing the bicycle in box.
Disc brakes can be actuated mechanically (cable) or hydraulically, where pressure from the brake lever is transferred to braking system via brake fluid or oil. More concretely, when the lever is squeezed, fluid is forced through the brake hose into the caliper, where it presses against pistons on both sides of the hub-mounted rotor. The pistons have pads that clamp onto the rotor, slowing it through friction. Hydraulic actuation delivers more force to the caliper than cable actuation, creating more stopping power and achieving faster stopping. Hydraulic systems also allow for better speed control, with only light feathering of the brake levers resulting in an immediate response. This is a huge advantage on long descents, where constant braking with cable-actuated discs (and especially cable-actuated cantilevers) can lead to hand fatigue.
As pads and rotor wear, the distance between them increases. Hydraulic pistons have seals that self-advance toward the rotor, even as the pads wear. Most cable disc systems, on the other hand, work by pushing on one brake pad, which presses the rotor onto the stationary pad on the other side. Over time, the cable will have to be readjusted to bring the pad closer and maintain good stopping power. Additionally, the brake cable will stretch over time, which will also require adjustment. Because the hydraulic system is sealed, it won’t have trouble with mud or grime. The one maintenance task that should be performed every 6 months is bleeding, the process of flushing out the old fluid and built-up gas from the lever, line, and caliper, replacing it with new fluid. On both cable and hydraulic systems, you should inspect the brake pads and rotors for wear and replace as necessary.
Comfortable Saddle
The saddle holds a humble position on the bicycle despite its critical function. Therefore, it is surprising that so many people give so little thought to a good saddle. Often, they unquestioningly use the inferior saddle that came on their bicycle, spending eight or more uncomfortable hours sitting on it, day after day. Saddles come in all shapes and sizes, so it’s a good idea to try as many as possible to find a good fit. Although a super-soft gel seat might sound tempting, it allows the rider to bounce around on it, creating chafing. Soft saddles also lead to a rocking, unsteady pedaling motion, which can tire the rider more quickly. It’s counter-intuitive, but softer saddles offer less support than harder ones.
Modern saddles feature a lightweight plastic shell beneath a thin layer of foam padding and a synthetic outer cover. While all firm saddles will provide some support, it’s important that they absorb the rider’s weight on the hips’ sit bones rather than on soft tissue. Women tend to have wider pelvises, translating to a wider saddle that reduces pressure points during long days. Additionally, many models have a cutout down the center, intended to relieve pressure on blood vessels and nerves running along the perineal region. Specialized’s famous Body Geometry series saddles come in multiple widths and ergonomic shapes to match your anatomy. Other leading manufacturers of synthetic saddles include Selle Italia, Fizik, and Terry.
One brand recognized by touring cyclists is Brooks, the first leather saddle.
Historical Note
In 1866, John Boultbee Brooks founded the J.B. Brooks company in Birmingham, England, for the manufacture of leather products. According to family lore, he began riding a bicycle after his horse died, but found the wooden saddle exceedingly uncomfortable. Brooks prototyped a leather saddle, patented it in 1882, and began selling it in 1888. Though the company has gone through several acquisitions, the Brooks leather saddle continues to be popular.
A unique quality of leather saddles is that they change shape over time to better fit the contours of your anatomy. Unlike their synthetic counterparts, leather saddles also absorb water, which is great for wicking away sweat from the body. Some long-distance cyclists sound almost religious when they extoll the virtues, most notably comfort, of Brooks saddle. The most popular model for touring is the Brooks B17, introduced in 1930.
Brooks saddles also have disadvantages. Being handcrafted, they are correspondingly expensive. Then, not everyone has the patience to get past the break-in period, even though the saddle should never be painful to sit on. While leather saddles are incredibly comfortable and durable when broken in, they are also susceptible to getting wet. Leather expands as it absorbs moisture and shrinks when it dries, losing its perfect shape in the process. Recommended maintenance includes applying Brooks’ own Proofide leather conditioner every 3-6 months, which provides splash protection from light rain and spray from underneath. When Brooks saddles must be left out in the rain, they invariably have a plastic bag wrapped around them. Lastly, leather saddles are heavier than their synthetic counterparts.
Handlebar with Multiple Positions
A second critical point of contact between the body and the bicycle is the handlebars. Long hours on the road can cause aches and pains, including neck, shoulder, and back discomfort, as well as hand tingling, soreness, and numbness. For this reason, riders appreciate handlebars that offer a variety of hand positions and activate different muscle groups. Basic flat handlebars offer only one position, unless augmented by simple bar ends. Some touring riders use bar ends fitted with shifters to avoid having to take their hands off the handlebar to shift. Others use Ergon handlebar grips, which provide a flat surface for the palms that distributes the pressure and promotes keeping your wrists straight. Some Ergon variants also have built-in bar ends.
Touring bicycles are usually equipped with racing-style drop handlebars, which provide three positions. In addition to “the bars” and “the hoods,” riding on the bottom of the hooked handlebars (“the drops”) provides a lower, more aerodynamic stance. More exotic handlebars are also available. The Jones H-Bars, for example, feature two transverse bars and a 45-degree sweep for a more relaxed wrist position. Randonneur handlebars have gently curving bars for hand comfort and flared ends to provide greater steering leverage. Butterfly handlebars curve back towards the stem, resembling two wings and offering various hand grips.
Sensible Pedals
There are three types of pedals to choose from: flat, clipless, and hybrid. We all learned to ride using flat pedals, which remain standard equipment on many bicycles. They can be used with any type of shoe and it’s easy to hop on or off. Mountain bike flat pedals have a large surface area with small metal pins around the perimeter to help keep your foot in place by digging into the shoe sole. These types of pedals will also help touring cyclists maintain a good grip on wet days or on rough terrain. The disadvantage of spiky flat pedals will become painfully clear should you ever be pushing your bicycle uphill and your leg strikes the pedal.
The second kind of pedal, which dominates the road racing world and has proponents in other disciplines as well, is the clipless pedal. These work with compatible footwear that have cleats screwed into their soles. Under pressure, the spring-loaded jaws click into place, capturing the shoe cleat and securing your feet in place. To release yourself from the pedal, simply twist your foot slightly… unless you are just learning the technique, in which case you might come to a stop, find you can’t disengage, and fall over.
Historical Note
Professional cyclists are on a constant quest to improve efficiency. Since the turn of the century, the pros had been securing their feet to the bicycle with toe clips, adjustable leather or nylon straps attached to the pedals that could be tightened around the shoes. In 1984, the French manufacturer LOOK applied their ski-binding technology to create revolutionary pedals. Because these pedals did not use toe clips, they were called “clipless.” Frenchman Bernard Hinault won his fifth and final Tour de France riding on LOOK pedals in 1985 and the peloton never looked back. Unfortunately, securing the shoe cleat to the pedal is today referred to as “clipping in,” leaving us with the confusing expression, “clipping into clipless pedals.”
While LOOK continues to sell clipless pedals, the most widespread system today is SPD (Shimano Pedaling Dynamics). SPD is so popular that some people use the acronym to generically refer to any clipless pedals. Shimano’s pedals optimized for road riding are called SPD-SL (SuperLight). They are single sided, meaning you can only clip in from one side of the pedal. The pedals naturally rest pointing downwards and you need to flip them up with your shoe as you start to ride. The corresponding stiff shoes with exposed cleats are not made for walking – as exemplified by any roadie gingerly wobbling across a café to fetch a pre-ride espresso. This setup is a huge disadvantage for touring cyclists, who are likely to make numerous stops and will want to stroll comfortably. Luckily, Shimano also makes double-sided SPD pedals. These clipless pedals, which are better suited for off-road cycling, have a small matching cleat that can be recessed into the sole of a shoe. This is a great advantage for a touring cyclist. On the bike you will be secured to the pedals, while off the bike, you will be walking normally during stops.
Not surprisingly, manufacturers have developed hybrid pedals, which are flat on one side and clipless on the other. These pedals are aimed at riders who might use flat pedals in one situation and clipless pedals in another. Instead of having to switch pedals, they can benefit from a single pair of hybrids. Touring cyclists don’t fall into this category, and don’t stand to benefit much from hybrid pedals.
Naming
On your best rides, you will become one with your bike, inseparable from it. At other times, you’ll be tempted to ditch your bike by the roadside and run. Being involved in such an intense relationship, many avid cyclists choose to give their two-wheeled partner a name. Choosing a suitable moniker is not as easy as it seems. The first consideration is establishing the gender of the bicycle, which is usually not possible by merely inspecting the frame. Next comes the style, weight, color, and other salient characteristics. Ultimately, the name comes down to the owner’s intuition.
Literary Note
I have not discovered many named bicycles in the literature. The name of Don Quixote’s horse, Rocinante, might be suitable for some bicycles, especially since long-distance bicycle touring is quixotic by nature. In 1960, John Steinbeck set out to see the United States in a custom-made camper he named Rocinante. However, he chose to title his ensuing travelogue Travels with Charley, thus demonstrating that his poodle was clearly more important than his vehicle. As for two-wheeled companions, Irish cyclist Dervla Murphy named her man’s bicycle Rozinante, nicknamed Roz. In Full Tilt: Ireland to India with a Bicycle, her account of a 1960s trip from Dunkirk to Delhi, Murphy refers to Roz as “her” in singular and “we” in plural. Another literary inspiration is La Poderosa (“The Powerful One”), the single-cylinder Norton motorcycle that Ernesto “Che” Guevara and his friend Alberto rode around South America. Sadly, La Poderosa was challenging to ride, malfunctioned frequently, and broke down completely midway through the trip.

Carrier Systems
Now that you have selected a bicycle, you must decide how to carry your gear. Although the classic bicycle touring combination is racks and panniers, there are alternatives. Bikepackers opt for small bags mounted to any non-rotating parts, including the frame, seat post, handlebar, and the fork. Towing a trailer is a third option. Touring with a heavy backpack can be done, but you never see those people on the road because they are lying under a tree, their backs aching.
Racks and Panniers
Historical Note
In the days when traveling by horse was the norm, people used saddlebags to carry supplies. Similarly, early bicycle tours were undertaken with handlebar bags and saddlebags sized to fit over the rear wheel. In 1975, Jim Blackburn designed the first modern metal frames, called racks, that attached to the bicycle. The Blackburn EX-1 rear rack used 9mm-diameter aluminum rods arranged in a three-strut design. The matching bags, called panniers, were given a rigid backing and some means to attach to the racks. This rack-and-pannier system continues to be standard for bicycle touring today.
Every type of touring bicycle is different. A rear rack for a Brompton folding bike will look very different than one for a fat bike. To determine compatibility with your bicycle, consider the wheel size, brake type, suspension, and attachment points.
Racks
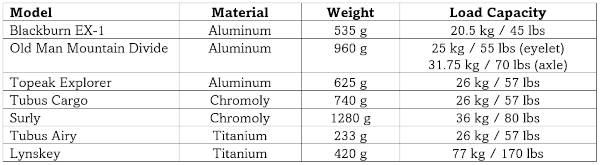
Strength and rigidity are paramount when selecting racks for a long-distance tour. As with bicycle frames, the materials of choice are aluminum, chromoly steel, and titanium. Aside from Blackburn, Old Man Mountain and Topeak make popular heavy-duty aluminum racks. Although heavier, chromoly tubing is generally stronger and more rigid than aluminum rod, meaning they are less likely to deform or break. Titanium racks are lighter but cost twice as much. Another plus for chromoly racks is that they are easier to weld than aluminum or titanium, which is especially advantageous should problems arise in remote areas. Remember, a broken rack can bring a tour to premature, catastrophic end. German-made Tubus is a leading brand for chromoly and titanium racks. Tubus products are solidly built and have a price tag to match. The geometry of their classic Cargo model is designed to provide exceptional rigidity.
Rear Rack
One consideration for rear racks is the size of the platform on top. The longer the platform, the more versatile the rack. A properly designed platform should allow for gear to be securely strapped lengthwise or crosswise. Other considerations include pannier attachment and adjustability, fitting for a rear light and fender, and aesthetics.
The rear rack should mount firmly to the frame, commonly attaching to the braze-ons at the dropouts and on the seat stays. Depending on the combination of bicycle and rear rack, attachment can be troublesome. Few bikes have seat stay braze-ons at the ideal height, corresponding to the top of the rack. Standard rear racks have aluminum mounting struts that might have to be bent to connect to the braze-ons. Fancier racks offer greater strut adjustability and even pivots to ease attachment. If you have disc brakes, look for racks that specifically accommodate them.
For bikes lacking braze-ons, a second type of rack is available, relying on a special quick-release attachment. A third type of rack, which mounts to the seat post, works on bicycles with rear suspension but lacks load-carrying capacity and should only be used on short rides.
The table below summarizes the characteristics of several leading rear racks:
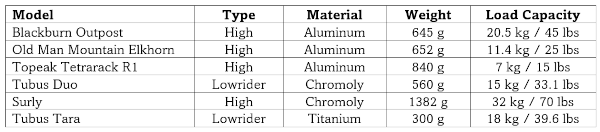
Front Rack
Front racks can be categorized as lowrider or high mount. Lowrider racks consist of two trapezoidal frames usually joined by a hoop over the front wheel. They keep the pannier center of gravity low, close to the steering axis of the fork. In contrast, high-mount racks more closely resemble rear racks, having a platform for extra gear and higher pannier center of gravity. The relative merits of lowriders and high-mount racks are an ongoing debate among touring cyclists. High-mount racks can be attached more securely and allow for larger front panniers. On the downside, a fully loaded high-mount rack might cause slower steering response.
Some bicycles have two sets of braze-ons on the front fork, one at the dropouts and one at mid-blade. Due to the variability in fork widths, fixing a front rack to these bikes might still require spacers. One exception is the Sakkit front rack, which has telescoping tubing and can expand or contract to fit any given fork. If braze-ons are missing, attachment requires extra hardware such as clamps and U-bolts, which tend to make the rack-to-fork connection more prone to problems. Front racks can even be attached to suspension forks, usually using a quick-release mounting system. Another solution is the Tubus front rack called Swing, with attachments at the fork crown and headset.
The table below summarizes the characteristics of several leading front racks:
Bolts
Having spent good money on racks, the last thing you need is a problem with the 4-mm bolts that hold them in place. You do not want them to get loose, worse fall out, or even worse, get sheared off under load. Therefore, it’s advisable to use stainless steel socket head cap screws, long enough to stick slightly out the other side when tight. Applying a bit of blue Loctite prevents the bolts from loosening due to the vibrations.
Panniers
Historical Note
Remarkably, one of the most heated debates in the cycling community concerns the correct pronunciation of this word: pannier. The etymology of pannier traces back to the Latin word for bread, panis. (Incidentally, your cycling companion is someone with whom you share bread.) The Latin for breadbasket, panarium, became the French panier, which today refers to a basket. The English borrowed the word in the Middle Ages. Over time, the spelling changed to pannier, with fully anglicized pronunciation (“pan-ear”). And how do the French say pannier? Sacoche.
Panniers are bags that hold most of the equipment needed for long self-sufficient tours. Mounting, capacity, access, and materials are other important considerations. As always, choosing the right panniers depends on length of time on the road, riding conditions, and budget.
Mounting
On the back side of a pannier there is usually a clever mechanism for mounting onto a rack. Some panniers are even meant to be used with a specific rack. The quality of a pannier’s mounting system, a critically important consideration, varies greatly. Failure of the mounting system can lead to a serious accident. In many cases, the pannier will fly off the bike and tear. If this happens on a downhill, you might lose control of your bicycle. Gear might be scattered on the road, causing other riders to have to swerve to avoid it. At the very least, a mounting malfunction will bring the trip to a quick halt for an indefinite time. Another consideration is how easily the panniers go on and come off during normal use.
Capacity
To choose pannier capacity, estimate the volume of gear to be carried. If you will be touring for a short period of time or can afford to stay in hotels, two rear panniers and a handlebar bag may be sufficient. Otherwise, you will need four panniers and two racks. Sleeping bags and tent are secured on the rear rack, while heavy and bulky items such tools, clothing, and your indispensable bowling ball go inside the rear panniers. The front panniers should contain lighter items and share the weight equally. You’ll know if they are unbalanced when you try to ride without holding on to your handlebars and feel the front wheel wobble. Touring panniers are usually sold in pairs and their capacity is given as a pair. The two larger bags usually hold a total of 40 to 60 liters (approximately 10 to 15 gallons) and are mounted on the rear rack. The two smaller bags, 20 to 30 liters (approximately 5 to 10 gallons) per pair are mounted on the front rack. It is recommended to split the load 60% on the rear wheel and 40% on the front wheel.
Access
A pannier can be categorized by how its contents are accessed – from the top or the front. Top loading panniers typically have a single large compartment with a drawstring closure. A lid goes over the compartment and is pulled down snugly with adjustable straps and buckles. Using this system, top loading panniers are expandable to accommodate the volume of gear and supplies carried and can be quite tall when filled. On the other hand, rummaging through a top loading pannier will often result in half its contents being pulled out in frustration. Front (or panel) loading panniers are opened and closed with zippers. Their shape is more square than top loading panniers and they usually have multiple compartments and pockets. As a result, front loading panniers give better access to their contents and allow for more systematic organization of equipment. All else being equal, front-loading panniers can be considered less durable than top loading panniers because the zippers are prone to mechanical failure.
Materials
Most panniers are made of soft materials such as polyester fabric, but there are also “hard-shell” panniers made of polycarbonate or other plastics. The biggest distinction is whether a pannier is waterproof or not. Many bags on the market claim to be waterproof, but very few will keep their contents dry after being exposed to hours of rain. The fabric might be completely watertight, but water can still trickle in around zippers and drawstrings.
The Cheap-O panniers I used for years performed beautifully in all areas except keeping the water out. I had to designate four trash bags, one for each pannier, to protect their contents, which would otherwise be soaked within minutes. One book I read at the time suggested wrapping each individual piece of clothing in a bag and leaving “sacrificial socks” to absorb the moisture collected at the base of each pannier.
My life changed when I purchased a pair of German-made Ortlieb Bike-Packer Plus panniers prior to a tour in Iceland. The welded seams and Cordura fabric keep even torrential rain out. The main compartment opened and closed like a backpack: the main compartment had a drawstring top, covered by a flap with buckles). The panniers were easy to put on and remove, with self-closing hooks that opened automatically when I pulled up on the carrying handle. Too easy, in fact. The panniers were stolen years later when my first wife left them, empty and unprotected, on her parked bicycle close to home. I then bought a pair of Ortlieb Back-Roller Classics, which have a plastic coating to go along with the famous welded seams. These panniers use the roll closure, which entails pressing the top of the sides together and rolling these three or four times for maximum waterproofness.
Ortlieb continues to be the most popular brand for panniers among long-distance cyclists. Other reputable brands include Vaude and Arkel.
Tip
Consider packing your clothing in plastic compression bags that you roll up to evacuate the air. Your clothing will take up far less space and be extra waterproofed.
Tip
When you tour with four panniers, it is advisable to develop a rigorous system so that you always know where things are. Less used, heavier items go in the bottom of the bag, essentials on top. Segregate items by category. For example, place all “kitchen” utensils in the front panniers and all “tools” in the rear panniers. Just remember, no matter how meticulous you are, if you open the right rear pannier first, the item you are searching for will be in the left rear pannier. Unless you try to outsmart your pannier by opening the left one first. In that case, it will have been in the right pannier all along.
Platform Bags
If your cycling tour involves camping, the space above the rear rack platform is usually reserved for carrying the tent and sleeping bag. Several manufacturers offer bags, often with straps and extra compartments, that can fit both items. When an inexpensive, waterproof bag is needed to carry camping equipment, a good solution is a dry bag, a flexible tube made of waterproof fabric with a roll-top closure to keep water out. Dry bags are available in different sizes (30 liters should hold a compact sleeping bag and tent) and thicknesses (a trade-off between weight and ruggedness). Compression dry bags have a valve that allows air to escape, thus minimizing bag volume. If camping equipment is not required, then smaller platform bags can be used. These provide supplementary space, and some can even be converted into backpacks.
Handlebar Bags
On tour, it is good to have certain items within easy reach. Handlebar bags should be easy to open and close with one hand, and are ideal for carrying valuables such as passport, camera, mobile phone, sunglasses, and lock keys. Since it is transporting documents and electronics, the handlebar bag should also be waterproof. Fancier models have a quick-release mechanism and a strap for use off the bike. If you still use maps, you can even buy a special transparent plastic pouch for the handlebar bag. This will eliminate the annoyance of having to stop repeatedly to pull a map out of a pannier compartment to look for directions.
Bikepacking Bags
A bikepacking setup typically comprises a frame bag, a seat bag, a handlebar bag or harness, and several accessory bags that distribute the load across the bicycle.
Frame Bags
A full-size frame bag fits inside the triangular space within the bicycle frame. These bags, which usually secure to the tubes with Velcro straps, can house larger, heavier items. While full-size frame bags don’t leave room for water bottle cages, half-size versions also exist that can coexist with water bottles.
Handlebar Bags
A handlebar is a natural spot on the bicycle to attach a bag. Indeed, handlebar bags have been in use since the earliest bicycle tours. Their design has continued to evolve, and now there are various models available in waterproof and abrasion-resistant materials with a quick-release mounting system. Many choose to transport their valuables in a handlebar bag. Some models are sold with a locking mechanism for extra security. When away from the bicycle for a short period, they simply take the handlebar bag with them (some models have a helpful shoulder strap). You should not place heavy items in the handlebar bag, as you will start to notice that the bike handles poorly.
Seat Bags
Bags that strap under the saddle rails and to the seat post are an important part of a bikepacking setup. In Germany, these bags are informally known as Arschrakete (ass rockets) because of their elongated conical shape. They range from lightweight and small (5 liters) to massive (17 liters). Regardless of volume, they add much less wind resistance than panniers.
Accessory Bags
There are a variety of accessory bags on the market, most of which are designed to give quick access on the road. Small, can-shaped bags that mount to the stem and handlebar are often called “feed bags” because they contain snacks. Top tube bags are also easily reachable on the move.
Trailers
Bicycle trailers can be used either as an alternative to racks and panniers or to ferry bulky sports equipment (skis, kayaks), children, and even pets. When two people are touring together, the stronger rider can carry most of the load inside the trailer.
Trailers have one or two wheels and can be attached to almost any bicycle. Single-wheelers are attached either to the seat post or to the dropouts using a proprietary axle. Their slim profile makes them well suited to singletracks while giving them low rolling and aerodynamic resistance. For precious cargo such as children and larger pets, a two-wheel trailer offers better stability and protection from the elements. For off-road touring, there are even child trailers with suspension. Two-wheelers are heavier and wider than single-wheelers, so the effort of pulling them is noticeable, especially on hills.
The Beast of Burden (BoB) Yak is the oldest and most established trailer. BoB sells a huge capacity, PVC-coated nylon bag called the Dry Sak, specifically designed for the Yak. These days, many other trailer options exist. The Polish-designed Extrawheel Voyager PRO has a wheel matching the size of your bicycle tires, either 26” or 700c, and attaches to the rear axle with a fork. Panniers attach at lowrider height, and in front of them there is room for two vertically attached transport bags, yielding a low overall load center of gravity.
Aside from the extra weight and drag of the trailer, taking one on a tour requires additional logistics. Two-wheeled trailers are especially cumbersome on public transportation, although some models can be easily folded or disassembled. Then there’s the need to carry extra inner tubes for the trailer wheel(s), and the worry that the trailer will have some kind of mechanical malfunction.
Accessories
Gadgets
A cycle computer – capable of displaying speed traveled, velocity, altitude, and other statistics – can be a useful navigation tool. It tells a cyclist approximately how far to go before a turn-off or how many more meters to climb before the top of the mountain. At the end of the day, those interested in performance can also record their distance covered, average speed, and total meters climbed.
Accessibility to GPS (global positioning system) data has revolutionized navigation. All-in-one GPS devices, such as the Garmin Edge series, measure all the expected data (and more) and can be connected to heart rate monitors, speed sensors, power meters, and more. You can download your planned routes to these GPS devices for turn-by-turn directions. After the ride, you can upload and share logs and performance statistics.
Lastly, some riders simply mount their smartphone to the handlebar, using an app to gain much of the same information displayed by GPS devices, as well as having quick access to all of the phone’s features.
Water Bottles
Two or three frame-mounted water bottles are essential for bike touring. Various water bottle cages are made to accommodate 600ml bottles, 1l bottles, and even the plastic 1.5l bottles found all over the world. If camping in remote areas away from a water source, you could carry an additional bladder such as the MSR Dromedary. Depending on where you are touring, you might want to bring along a water filtration system.
Many attempts have been made to improve on the classic plastic water bottle: larger sizes, wider mouths, more durable materials, screw-top lids. Unfortunately, the water always seems to taste like plastic. For this reason, some people prefer to tour with aluminum water bottles. If you are also transporting a fuel bottle in a cage, don’t confuse the two!
Portable Pump
The two main choices on tour are frame pumps and mini pumps. Frame pumps have a clip for easy attachment under the top tube, while a mini pump might be carried on a special bracket or inside a pannier. Frame pumps have longer cylinders and achieve more pumping power per stroke, resulting in higher tire pressures with less effort. A mini pump offers the advantage of portability off the bike; that is, it can be easily carried around if theft is a concern. Topeak makes the popular Morph series of pumps. The Road Morph attaches via a flexible hose, eliminating the possibility of breaking a valve stem, and has a flip-down foot which converts it into a floor pump for even more pumping efficiency. The handy in-line gauge reads up to 140 psi, which seems completely unattainable.
Fenders
Fenders can be difficult to attach to some bicycles, but the extra effort becomes worthwhile when touring in wet weather.
Lights
Working front and rear lights are a necessary safety precaution because campgrounds don’t magically appear at dusk and tunnels aren’t always short and straight. Bicycling after dark without lights is extremely dangerous, and illegal in many countries. A front light can also double as a flashlight, useful when camping.
Standard LED (light-emitting diode) lights click into handlebar-mounted brackets or attach to the seat post. They usually have several modes, including flashing, which is more visible to drivers in traffic. Lights are rated in terms of brightness (lumens) and power (watts).
Locks
Although they are heavy and bulky, U-locks and cable locks are the most popular ways to safeguard the bicycle.
Rear-view Mirror
Not everyone can get themselves to install a rear-view mirror on their bicycle, but those who do swear by it as a lifesaver.
Bell
A warning ring produced by a bell is appreciated by pedestrians and other cyclists.